Feb 10, 2016

Muthiya

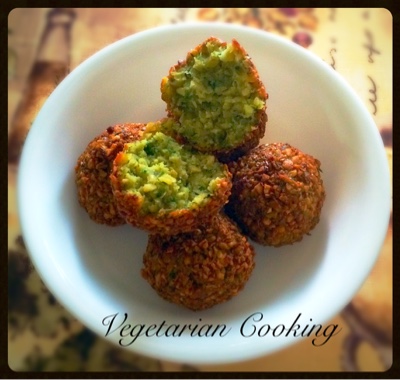
Muthiya (spiced vegetable dumplings) is a very famous gujarati appetizer. The procedure I've described below may seem lengthy but trust me - it is super easy to make, most of it is just me trying to explain the process in a detailed way so it is easy for you all :).

I hope you give this a try and let me know your feedback in the comments section below. Happy cooking!

Ingredients:

  • 2 cups Coarse Wheat Flour (also known as Laddu Flour)
  • 1 1/2 cups grated Indian Squash (cabbage/fenugreek leaves/onion can also be used as a substitution)
  • 1 tsp Green Chillies Paste
  • 1 tsp grated Ginger
  • 1 1/2 tsp grated Garlic
  • 2 tsp Red Chilli Powder
  • 1/4 tsp Turmeric Powder
  • 1 tsp Achaar Masala/Pickle Spice Mix
  • 1 1/2 tbsp crushed Jaggary
  • 2 tbsp oil
  • Water - as needed
  • Salt to taste

Tempering:

  • 4 tbsp Oil
  • 1 1/2 tsp Mustard Seeds
  • 1 1/2 tsp Sesame Seeds
  • 8-10 Curry Leaves
  • 1/2 tsp Asafoetida/Hing
  • 1 tbsp Cilantro

Garnishing:

  • 1 tsp finely chopped cilantro/green coriander/dhaniya

Method:

  • This recipe requires to be steam-cooked. Now, those of you who are not familiar with steam-cooking, it is a process of cooking with the heat from the steam wherein the food being cooked gets direct contact of ONLY the steam and not the boiling water. This is very important. To know more about this process, this article in wikipedia gives a decent description. Now, if you don't have a steam-cooker like I do, there is no need to worry, we can always improvise! What you'd basically need is a big pot with a lid and a steamer rack like this one that is smaller in diameter than the pot so that it can be placed into the pot. Make sure the water level is below the steamer rack that you are using so that the bottom of the steamer rack comes in contact only with the steam. I have always used all stainless-steel utensils for the steamer so I wouldn't be able to vouch for other materials like glass/bamboo... But if you do, please leave me the details in a comment below!
  • In your pot, place the steamer rack with enough water so that it stays below the level of your steamer rack. Put this pot on high heat and make sure to cover it
  • Now, in a large bowl, add coarse wheat flour, grated indian squash, green chillies paste, grated ginger, grated garlic, red chilli powder, turmeric powder, achaar powder, jaggary (make sure it it crushed well or else you'll have lumps of sweetness in your muthiya and trust me - you don't want that to happen!) and oil; mix well (I find mixing using my hands works the best but you can use a big spoon as well).
  • Now, add water, little at a time. I'm not mentioning the quantity of water as it depends on the quality of flour, the moisture content in your squash, etc. The mixture should be of very thick consistency - you should be able to roll them into cylindrical rolls by taking some mixture in your hands and making an open/close movement of your fist. If it doesn't stay in shape, you need more water. The consistency, by no means, should be watery. Once you have your mixture ready, set it aside.
  • Once the water in your pot is boiling, open the lid and reduce the heat to low (this is to avoid getting burnt by the steam). Now, take a fistful of mixture in your hand and roll it into cylindrical log shape using an open & close movement of your fist; once done, immediately put it on the steamer rack in your pot. I find it easier to work my way from the peripheral to the center. Make only one layer do not stack one on top of other. Cover the pot, increase the heat to high and cook for 8-12 minutes. 
  • To check the doneness, insert a knife/toothpick into the center, it should come out clean. 
  • Once done, turn off the heat and carefully remove the steamer rack out of the pan and let it cool down.
  • Separate each of the logs and slice them approx. 1/4 inch thick. I like to cut them into smaller pieces as it helps incorporating more crispiness (our family likes it that way)!

  • Tempering:

    • In a pan, heat the oil. Add mustard seeds; once they start crackling, add sesame seeds, curry leaves and asafoetida; give it a quick stir and add the cut muthiya/dumplings and stir to coat them well.
    • Cook for 2-3 minutes stirring every now and then. If you like crispiness in your dumplings, cook for additional 3-5 minutes.
    • Mix in the cilantro and stir one last time.
  • Garnish with cilantro and serve hot 
  • Enjoy!!

Feb 9, 2016

Eggless Fudgy Brownies

Brownies..! I first tasted these beauties at cafe-coffee-day in India. They were served with scoop of ice-cream on top.. Yummm was the feeling when I'd eat that.. This was more than a decade ago and i had zero knowledge/experience of baking back then (I had never imagined I'd be able to re-create it in my own kitchen!!) But here I am, experimenting and trying to create recipes that are simple to make but delicious to eat! I get lazy when I read about cumbersome procedures and I try to simplify the process for my myself and my readers! :)

So presenting this eggless fudgy brownie recipe which is easy to put together and with valentine's day around the corner, do give this a try! My family & I loved this and I'm sure you and your family (or that special someone ;).. would too!


Ingredients:

  • 1 cup Semi Sweet Chocolate Chips
  • 5 tbsp Unsalted Butter
  • 1/2 cup Sugar
  • 2/3 cup All Purpose Flour
  • 1/2 cup Plain Yogurt
  • 11/2 tbsp Unsweetened Cocoa Powder
  • 1/8 tsp Baking Soda
  • 1/4 tsp Baking Powder
  • 1/8 tsp Salt
  • 1 tsp Instant Coffee Powder (I used Bru)
  • 2 tbsp Warm Water

Method:

  • Pre-heat the oven to 350F; line an 8x8 square pan with aluminum foil and spray with nonstick cooking spray. Make sure the foil extends beyond the sides of the pan, this will ensure easy removal of the brownie.
  • Mix instant coffee in warm water and set it aside. 
  • Mix all purpose flour, cocoa powder, salt, baking powder and baking soda and set it aside. Make sure you sift the cocoa powder if it has lumps before mixing in. 
  • In a mixing bowl, using an electric mixer or a wire whisk, beat sugar and butter until nicely combined.
  • Add yogurt and beat again.
  • Add instant coffee mixture and vanilla extract and beat again.
  • Now mix all the dry ingredients and beat until incorporated.
  • Melt chocolate over double boiler and let it cool down a bit. Combine it with the mixture and pour it in the pan and even it out using the back of a spoon or a small angled spatula.
  • Bake for 25-30 minutes or until a toothpick inserted into the center comes out clean. Wet crumbs lingering onto the toothpick is ok but there shouldn't be any wet batter.
  • Let it cool down and dig right into it!!

Serving Suggestion:

  • Serve it warm with a scoop of ice cream and a drizzle of chocolate sauce on top
  • You can also omit the ice cream and just drizzle chocolate sauce over it...
  • You can also add toasted cashew nuts (or any other nuts of your choice) as a topping on either of the options above! Possibilities are endless...

Nov 26, 2015

Eggless Pineapple Cake with Whipped Cream Frosting

Ever since I was first successful and satisfied with my eggless cake, I've been excited to try other recipes as well. The base remains the same and with simple modifications, we can create so many different varieties!

After the great success of Mother's Day came the occasion of Father's Day and below are the pictures of the cake I baked then (I know I'm too late to post here but well better late than never right?) which was a super hit as well.. Everybody absolutely loved it! Unfortunately, I did not get a chance to take a good cross sectional picture! But I atleast got one this time!!

This is also an incredibly simple recipe and I hope you guys give this a try.. Do let me know your feedback in the comments section below.. Happy cooking


Ingredients:

  • Cake:
    • 1 cup hung Yogurt
    • 1 cup Sugar
    • 1/2 tsp Baking Powder
    • 1/2 tsp Baking Soda
    • 2 tsp Pineapple Extract
    • 1/2 cup Oil
    • 1/2 cup All Purpose Flour (Maida)
    • 2 tbsp Semolina/Sooji
    • 1/4 cup Warm Milk (I used half and half; regular milk can be used as well)
    • 3-5 drops of Yellow Food Color (Optional)
  • Whipped-cream Frosting:
    • 1/2  cup Heavy Whipping Cream
    • 1/4 cup confectioners sugar
    • 1/Pineapple Extract
  • Cake Assembly:
    • 1 can of sweetened Pineapple - Chunks

Method:

  • Cake:
    • Preheat the oven to 350 degrees Fahrenheit/180 degrees Celsius.
    • In a mixing bowl, mix the hung yogurt and sugar; beat well.
    • Add baking powder n baking soda, mix well and let it stand for 5-10 minutes. The mixture will bubble up.
    • Add pineapple extract and if using food color, add it as well and mix well.
    • Add oil and mix well.
    • Add the sieved all purpose flour and Sooji and mix to combine; do not over mix.
    • Finally add 1/4c warm milk (I used half and half; regular milk can be used as well) and mix well.
    • The mixture should be of dropping consistency.
    • Pour in the prepared tin. (I split the batter into two tins for the sake of incorporating more layers..)
    • If you are splitting into two tins, bake for 20-25 minutes - or until a toothpick inserted into the center of the cake comes out clean.
    • In case you decide to choose the single tin method, the baking time will increase by about 10 minutes; total bake time of 30-35 minutes (or of course until a toothpick inserted into the center of the cake comes out clean).
  • Whipped-cream Frosting:
    • Before starting with this process, I'd like to share a few tips that'll help you get perfect frosting each time:
      • Try to work during cooler times of the day (either early mornings or evenings).
      • For best results, use a stainless steel bowl.
      • Keep the beaters, the bowl and the whipped cream in the freezer for 15 minutes just before beginning to make the frosting.
      • Your heavy cream should have atleast 35% butter-fat content. The frosting wouldn't hold well if the fat content is less.
    • Add the whipping cream in the mixing bowl and using either a stand mixer or an electric beater, start at medium speed and gradually increase to high speed.
    • Keep beating continuously until you reach soft peak consistency. Soft peak stage is when the cream is no longer in a liquid state and when you lift your beater, it would form a peak but it wouldn't hold its shape well. It should NOT be dripping at all.
    • Stop beating and add the sugar & pineapple extract. 
    • Now, start beating again on low speed (until the sugar is incorporated) and gradually increase to high speed until the cream has reached stiff peaks consistency. Stiff peak stage is when you lift the beater, a stiff peak is formed and it holds its shape.
  • Cake Assembly:
    • You can use the cake from the two cake tins as-is or you can split them into halves (if more layers is what your heart desires!). I did not split the cakes any further
    • Drain the pineapple can (reserve the sugar syrupy water). 
    • If the chunks are big, chop them into smaller chunks.
    • Apply the sugar syrup (from that reserved from the pineapple can) on each layer and frost the layer with the fresh cream frosting.
    • Now add few pineapple chunks (as evenly as possible to cover the entire layer).
    • Cover with the next layer. Repeat this process if you have more than two layers.
    • Now frost the cake to just make a crumb coat (yes crumb coat because we are going to cover the entire cake with rosettes the coating doesn't need to be perfect!!..).
    • I used Wilton star tip and used a swirl motion to create the rosettes. I worked my way from edges to the center.
Enjoy!!

Aug 27, 2015

Penne pasta in Basil Pesto Sauce

Basil pesto sauce - it is my favorite pasta sauce and any mention to it makes my mouth water! It is incredibly simple to prepare this recipe and once you give this a try - you will NEVER go back to buying store bought canned pesto sauce again... I promise!! So without wasting anymore of your time, let me take you over the ingredients and super simple process.

Do give this a try and let me know your feedback in the comments section below. Happy cooking!!

Ingredients:

  • To make the Pesto Sauce
    • 2 cups Fresh Basil
    • 1/2 cup Pine Nuts - roasted
    • 2 tbsp minced garlic
    • 1/4 cup + 2 tbsp Extra Virgin Olive Oil
    • 1 cup Parmiggino Reggiano (adjust to taste) - finely grated
    • Salt & Pepper - to taste
  • To make the Pasta
    • 1/2 lb Penne Pasta
    • Water
    • Salt

Method:

  • To make the Pesto Sauce
    • Wash & dry the basil. You can use the stem that comes with the leaves as it contains a lot of flavor too.
    • In a food processor, add basil, roasted pine nuts, garlic, salt and pepper. Process it until it becomes a smooth paste. Add the oil and process it to incorporate it evenly. 
    • Remove the paste into a bowl and mix in the parmiggino reggiano. At this point, you can taste it and adjust the seasonings if necessary.
  • To make the pasta, boil the pasta as per packaged instructions - make sure to season well with salt as this is the only time your pasta will have to absorb any seasonings; when done, reserve about 2 cups of water and drain the pasta.
  • Mix the pesto sauce with the pasta and add the reserved pasta water (1/2 cup at a time) until the sauce is coated well on the pasta and it doesn't feel dry.

Serving Suggestions:

Serve with garlic bread; homemade or store bought - your choice :)..
Garnish with grated parmiggiano reggiano when serving for extra oomph! (i.e. if you don't mind the extra calories...)

Coconut Chutney (Spicy Coconut Dip)

Coconut chutney is a spicy flavorful dip that is generally served with South-Indian delicacies. It is very easy to make and needs just handful of ingredients which will all be easily available at any of your local Indian grocery stores.
Do give this recipe a try and let me know your feedback in the comments below.

Ingredients:

  • 1 1/2 cup Fresh Grated Coconut (I used the frozen variety)
  • 2 tbsp Roasted Urad Dal/Black Gram/Black Lentil
  • 2 tbsp Cilantro
  • 1/4 cup Water (or adjust to your liking)
  • For Tempering:
    • 2 tsp Oil
    • 1/2 tsp Mustard Seeds
    • 1/2 tsp Urad Dal/Black Gram/Black Lentil
    • 2-3 Dry Red Chillies
    • 4-5 Curry Leaves
    • 1/8 tsp Asafoetida 

Method:

  • Grind the urad dal in a food processor.
  • Add the cilantro and grind again.
  • Finally, add the grated coconut and grind it one more time. Add water to aid the grinding process (only if necessary).
  • Take the ground chutney in a serving bowl and add the remaining water.
  • In a small saucepan or a small tempering bowl, heat the oil on medium heat. Add mustard seeds and black gram and let the mustard seeds crackle. Lastly, add dry red chillies, curry leaves and asafoetida and pour it immediately over the prepared chutney mixture.
  • Stir to combine and serve!
  • Enjoy!!

Serving Suggestions:

Coconut chutney is served with South Indian delicacies like idly, sambar, medu vada, etc.

Jul 17, 2015

Jerusalem Salad

Presenting "Jerusalem Salad".. This is a very simple to make salad, which, as the name suggests, originated from Jerusalem. It is also known as Israeli Salad. It is made of cucumbers (preferably the Persian ones as they have very soft & tiny eatable seeds), tomatoes, parsley and onions. Very simple to put together yet incredibly flavorful.. Let me take you over the ingredients and you will want to go into your kitchen and make a batch! Do let me know your feedback in the comments section below.. Happy cooking!!

Ingredients:

  • 2 cups Diced Cucumbers (preferably Persian variety)
  • 1 cup Diced Deseeded Tomatoes 
  • 3/4 cup Diced Onions
  • 1 cup Finely Chopped Parsley 
  • 1/4 cup Lemon Juice 
  • 1/4 cup Extra Virgin Olive Oil 
  • 1 tsp Ground Cumin 
  • Salt & Pepper to taste 

Method:

  • Mix lemon juice, extra virgin olive oil, ground cumin, salt & pepper and set it aside. 
  • In a mixing bowl, add the diced cucumbers, tomatoes, onions and parsley; add the dressing from the step above and give it a good mix. You are all set now! Yes, so simple :-)
  • Enjoy!

Serving Suggestions:

Jerusalem salad is traditionally served with pita bread, usually along with falafel and tahini sauce.

Jul 14, 2015

Falafel (Ground Chickpea Fritters)

Presenting "Falafel"... The famous Mediterranean vegetarian fritters, typically served in a pita bread in the form of a sandwich (open pita pocket or wrapped) but it is equally delicious with hummus and tahini sauce. It is a perfect blend of crushed chickpeas and parsley and/or cilantro with a hint of garlic and some seasoning. So let me get right to the handful of ingredients and the simple process that you'd need to follow and you'll indulge in thus awesomeness - it's a guarantee! I hope you do give this recipe a try and let me know your feedback in the comments section below.. Happy cooking!! 


Ingredients:


  • 1 1/2 cups Chickpeas (uncooked)
  • 1 tbsp Garlic Minced/Crushed
  • 1/2 Onion (Medium sized)
  • 1/2 cup Parsley (or Cilantro or a combination of both)
  • 2 tbsp All Purpose Flour 
  • 1 tsp Paprika 
  • 2 tsp Ground Cumin  
  • Salt & Pepper to taste 
  • Oil to fry

Method:


  • Soak the chickpeas for at least 12 hours. You'll notice they would've bloated to almost double the size. They, however, would not be as big as the cooked ones e.g. the ones you'd have noticed from the cans. No need to worry about it, as this is expected. 
  • Now, drain the chickpeas and lay them flat on a kitchen towel; idea is to remove as much moisture as possible. 
  • DO NOT substitute with the canned chickpeas, they will not work and will be nowhere close to the version you've seen in the restaurant. 
  • Add the chickpeas, onion, garlic, all purpose flour, parsley (and/or cilantro whichever one you are using), paprika, ground cumin, salt & pepper to a good processor and pulse until you achieve a coarse mixture. Empty the mixture to a bowl and refrigerate covered for at leas an hour. 
  • Heat the oil on medium heat. You know the oil is ready when you drop a little bit of the mixture in the oil, and it starts bubbling right away. If you see a lot of smoke coming out of your pan, reduce the heat to low and let the oil cool down. Repeat the precious step to test the oil. 
  • When ready to fry, take the mixture out of the refrigerator. While the oil is heating up, make the falafel balls. Dust your hands in flour to begin making the balls; it's easier that way. 
  • Fry on medium heat (this will allow the falafel to cook from inside while the outer coting is getting cooked). Turn the falafel upside down if needed. Fry until medium brown in color. 
  • Enjoy!! 

Serving Suggestions:

Serve falafel with hummus & tahini sauce or in a pita bread as a sandwich.